The main personal project I’ve been working on for the past few months is a customer service / support application where customers can communicate with technicians via email. That is, the customers send emails to the service, and techs using the service simply see a thread of comments going back and forth. I built this app to learn about sending and receiving emails with Rails. The application itself is live at helpzoneproject.com, and you can see a demo of the core functionality below:
The source code is available here.
Okay, so let’s talk about this thing - what my goals were, how I got it working and what my challenges were in the process.
Objectives
My primary professional development goal right now is to deepen my understanding of all the various pieces of Ruby on Rails. The email-related parts of Rails (i.e. ActionMailer) had always been a bit shaky for me, so I felt that I ought to try and build something where the main functionality was email-based. ActionMailbox had become available not too long before with the advent of Rails 6, so I decided that I would include that in the project as well. Just to clarify - ActionMailer is a library that assists in the sending of emails from your application, and ActionMailbox is a library that assists in organizing incoming emails that are being sent to your application.
Pieces
This post will cover some things about ActionMailer and ActionMailbox, but to be honest, I didn’t find those libraries to be the challenging part of this project. What was difficult for me was all of the other infrastructure surrounding this project, so that’s what I’m going to be emphasizing today.
The infrastructural(?) pieces that we will need for this project are as follows:
- A registered domain name
- An EC2 instance to run the rails server on
- An SMTP service to handle the sending and receiving of email
The part of this stack that was newest to me was the SMTP service. Before starting this project, I didn’t know all that much about how email works behind the scenes and had to quickly get up to speed on it. I’ll probably write a separate post about all the things I learned about email, but here is a simplified version:
Email is usually sent via a protocol called Simple Mail Transfer Protocol (SMTP), which lives on top of TCP. It can also be sent via web - i.e. using HTTP, (which also lives on top of TCP) - but the standard way is via SMTP.
To send email using the SMTP protocol, you need an SMTP server. An SMTP server is just a computer running some software that implements the SMTP protocol. There are many different softwares that do this, the most famous one probably being Exim.
However, this is really only relevant if we want to manage our own mail server, which we really don’t - we’d rather use a service that takes care of that for us. Enter SMTP services. There are tons of options - Mailgun, Mandrill, Amazon SES, etc. Many of these services also include other features besides just SMTP, which can be a bit confusing, but for simplicity’s sake we’re going to ignore that for now. So, just to reiterate - we need an SMTP server to send and receive email on the internet, but we don’t want to get into the weeds dealing with that ourselves, so we’re going to use an SMTP service instead, which is much easier to use, and will set up the SMTP server for us.
For the record, ActionMailer/ActionMailbox will work either with an SMTP service, or an SMTP server that we set up ourselves. That might be a fun project in the future, but for now, we’re going to stick with a service.
Let’s use Sendgrid!
Okay, so all in all we end up with something like this:
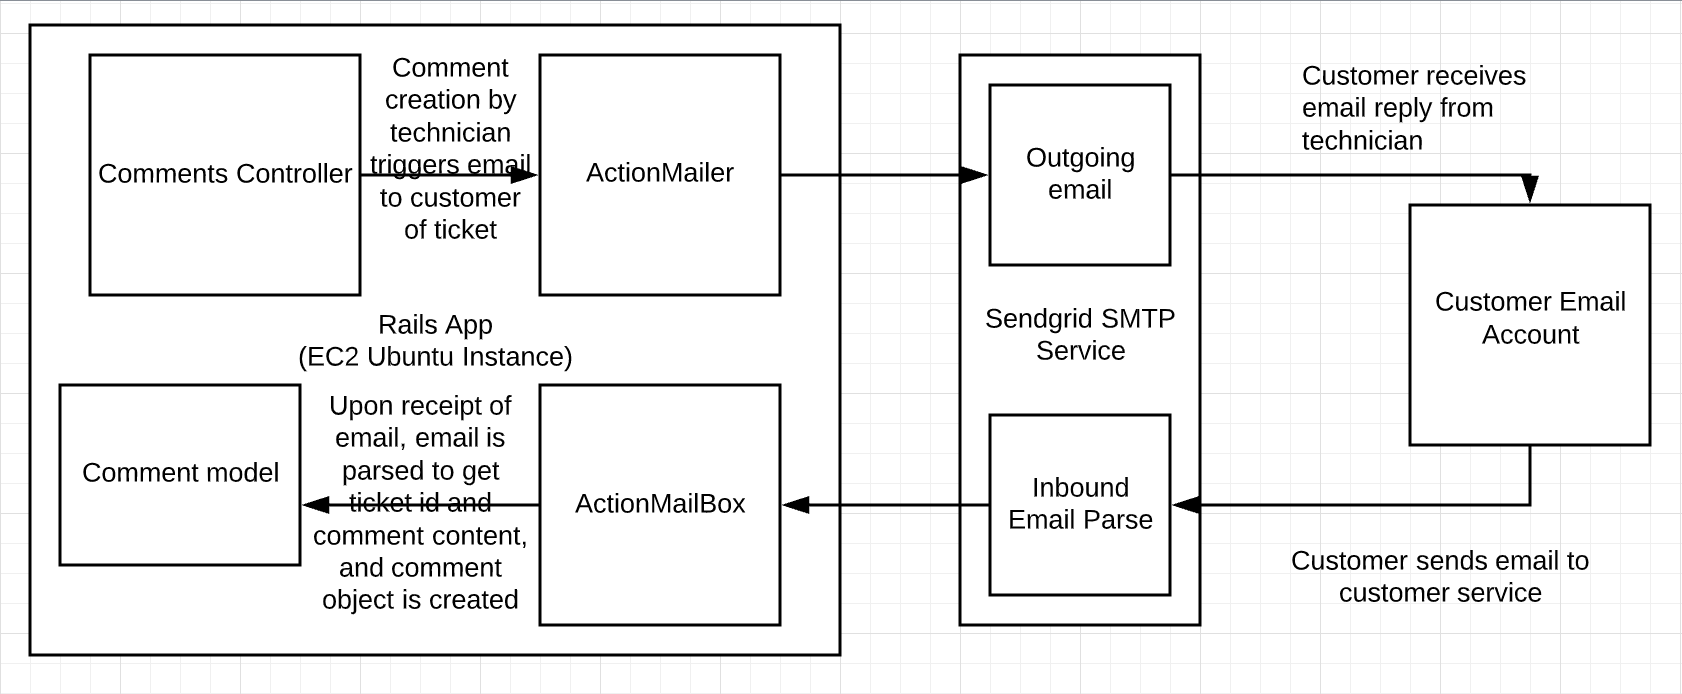
Alright, so now I’ll go through the various facets of this project that were the trickiest for me and how I got through them
DNS Difficulties
So when I sat down to wire all this stuff up, I had three main pieces I was working with:
- The Rails app, running on an AWS EC2 Ubuntu instance
- The domain name, registered at NameCheap
- My Sendgrid account
Many platforms for deploying web apps will hold your hand a lot when it comes to setting up your domain name, your name servers, etc. You end up never really having to understand them too deeply and that had been my experience before now. Heroku, for example, will abstract away all of your DNS stuff so you can just get your app up and running. I haven’t registered a domain through AWS before, but I imagine that it’s a similar experience. Since I had registered this domain via a different platform than the one I was running my app on, I needed to learn some things about DNS so that I was able to wire up my nameservers correctly.
The first mental shift I had to make was breaking apart DNS and HTTP in my mind, realizing that DNS and HTTP basically don’t interact with each other at all, that their closest “common ancestor” in the protocol stack is IP. Once I understood this, and learned how exactly DNS works, I was able to understand how I needed to make everything work.
One thing to know about DNS is that propogation times - the time from making a change on a DNS server to seeing it take affect - can be insane. And thought namecheap was low-cost and easy to use, its propagation time were between 24 and 48 hours. So I wouldn’t be able to do all of my DNS work at namecheap. Perhaps for someone who knows exactly what they’re doing, those kind of propogation times are something you can deal with, but as someone who was still learning about DNS, I needed to be able to tinker - to make changes and see effects quickly.
AWS provides a DNS service called Route 53, which you can use to spin up your own nameservers and configure them as you like. Most importantly for me, though, its propagation times were around 60 seconds. I ended up configuring my settings at namecheap to use the nameservers I set up on Route 53, and boom - now I could do all of my DNS work in AWS.
Meanwhile, I had gotten a free-tier Sendgrid account up and running. Actually, I had learned before this that you can link up ActionMailer with a gmail account, and send emails from that account, so that’s what I started with, but then I realized that I wouldn’t be able to also process incoming email unless I wired up my app with a full-fledged SMTP service. Technically, I could have continued using Gmail for outgoing email, and Sendgrid only for incoming email, but that seemed like a pretty stupid thing to do. But I could have!
The first thing that Sendgrid made me do once I got my account up and running was to authenticate my domain. This means that on my nameservers over at AWS Route 53, I added a couple of records to basically say “such and such email servers are my official email servers. To any customer out there, if you receieve an email from this particular mail server, you can rest assured that it is from helpzoneproject.com, as it claims to be.” This domain authentication process actually took me a long time - this was before I had made the switch to Route 53, and before I realized how fast its propogation times were. Just like anything in programming, short feedback loops are vital. Having to wait 48 hours between changes to my DNS records to see if there was any effect was ridiculous. Well hey, at least now I know that there’s an alternative. One other thing I’ll mention is that, depending on how your DNS service does things, it can be really easy to format things incorrectly in your DNS records. For example, if you’re creating records for subdomains, some services want you to write out the entire domain, but with other services that breaks everything. And some of them may want you to include the “dot” at the end of the domain, and others not. Point is, if you run into problems at this stage of things, there’s a decent chance that incorrect formatting in your DNS records is causing it.
Once I got all of that figured out, I pretty much had my DNS wired up correctly - my namecheap account defining the domain and pointing to the nameservers at AWS, my CNAME records pointing to the Sendgrid mail servers, and my A record associating helpzoneproject.com with the correct ip address.
ActionMailer and ActionMailbox
Once DNS was working, it was time to get my Rails app actually sending and receiving email. Once again, configuration actually proved to be more challenging than actually using the tools. The important files to keep in mind here are /config/environment/production.rb and its development equivalent. The first thing I noticed when setting up the configs is that there were way more configuration settings for ActionMailer than there were for ActionMailbox. That makes sense to me - ActionMailer has to prove to Sendgrid that it’s the app that it claims to be, show that it has the proper credentials, etc. ActionMailbox just has to sit there and listen for any email that gets sent to the domain.
All in all, this is the config that I ended up with:
  config.action_mailbox.ingress = :sendgrid

  config.action_mailer.perform_caching = false
  config.action_mailer.raise_delivery_errors = true
  config.action_mailer.delivery_method = :smtp
  config.action_mailer.perform_deliveries = true

  config.action_mailer.default_url_options = {
       host: "http://helpzoneproject.com"
  }

  config.action_mailer.smtp_settings = {
    enabled: true,
    address: 'smtp.sendgrid.net',
    port: 587,
    domain: 'smtp.sendgrid.net',
    user_name: Rails.application.credentials[:sendgrid_username],
    password: Rails.application.credentials[:sendgrid_password],
    authentication: "login",
    enable_starttls_auto: true,
    openssl_verify_mode:  "none"
  }
This config allows outgoing emails to be sent via sendgrid, and allows sendgrid to forward incoming messages to our application. We’re all set!
Now we just have to write the application code. Let’s start with outgoing emails.
I have a mailer called ticket_mailer.rb that include the following method:
  def send_ticket_comment(comment)
    @comment = comment
    mail subject: "Replying to ticket"
    mail to: comment.ticket.email
    mail from: 'customer_service@helpzoneproject.com'
  end
This method essentially defines where the email will be going, who it will be from, what the content will be, etc. There is a corresponding mailer view that specifies exactly what the email will look like - we’ll get to that in the “parser” section.
Now, in terms of incoming emails, we handle that in app/mailboxes/comments_mailbox.rb. ActionMailbox requires that we define a method called process. This method will run automatically whenever the application receives an email. Inside of that method, we will have access to an object called mail which will contain info about the email. My process method looks like this:
  def process
    ticket_id = get_ticket_id(body: mail.text_part.decoded)
    if ticket_id
      build_comment_from_email(mail, ticket_id)
    else
      open_new_ticket(mail)
    end
  end
As you can see, what I’m doing here is checking to see whether this email is in reference to an already-existing ticket, or if we need to open a new one. If the ticket already exists, this incoming email will be parsed, turned into a comment and appended to the collection of comments that are associated with that ticket. Woot!
Parsing Emails
The part of this project that was the most “programmy” - i.e. actually figuring how to do something with code instead of just struggling w/ complex configurations - was figuring out how to pass a chain of messages back and forth between a person on an application and a person on an email client, in a way that made sense and looked good to both.
The mail object that we discussed above is an instance of the ruby class Mail::Message. When I first encountered this class, I figured it would be pretty easy to get the body of the email from its instances. Nerp. Despite the fact that you can access the message’s meta information with methods like .date and .from, a bunch of that metadata is also prepended to the body of the message (accessed with .text_part.decoded). Fortunately there’s a gem for this - email_reply_parser. I was excited to see that it was actually written by Aaron Patterson, Rails royalty! Anyway, that solved my parsing problem - now I was able to provide correctly-formatted bodies for my comments. Awesome. All I had left was to figure out how to associate comments with the correct ticket.
At first I wanted to find a way to do this stealthily - maybe a hidden HTML element in the email. What I realized, though, is that most email clients don’t accept emails with hidden elements in the body. Which makes sense - anything else would lead to security problems.
In the end I opted for a less-beautiful solution, but one that worked. I simply added “ticket id tags” to the end of the email, with the ticket id in between them. I also added a message for users to not alter or remove text “below this line,” which guarantees that the id will be present in the customer’s reply to the application. This is what the ID looks like at the bottom of the email:
%p="Ticket ID: <start_id>#{@comment.ticket.id}<end_id>"The reason I went for XML-style “surrounding” tags is because the ticket ids are incremental, not UUIDs of consistent length. So in order to be able to parse the email correctly and be confident that I knew where exactly the id started and stopped, I needed to be able to search the email string for an explicit starting point and explicit ending point. If you’re reading this and know of a way that I could send an id through an email without it being visible to the user, I would love to hear it! :D
Conclusion
And that’s that! In broad strokes, this is how HelpZone works. I learned a ton about a lot of different subjects while building this thing, and I plan to write some posts in the future that dive into those specific topics a bit deeper - fx, I’d love to do a post just explaining I know how DNS works, or everything I now know about email. Keep an eye out for those, and thanks so much for reading!